How It Works
An SFTP server provides interactive access for DOOR users to beamtime directories using the SSH File Transfer Protocol (SFTP).
It allows you to browse and download beamtime data using any suitable SFTP client. Access is granted according to the working group definitions in the Gamma Portal.
In order to use the SFTP server, your site needs to allow outgoing traffic on TCP port 22.
To access your data, use a suitable SFTP client to connect to psftp.desy.de. We have tested the service with FileZilla, rclone, Cyberduck and WinSCP, see below for Configuration Examples for Tested SFTP Clients.
In general:
- Setup one of the tested SFTP clients for psftp.desy.de
Use your DOOR account to authenticate to the SFTP server
- After login, you can see your accessible beamtimes.
The FTP Registration procedure with the Gamma Portal is NOT required for SFTP.
Even if you do not have access to any beamtimes, you can verify your client setup. You can always access the README.txt or download one of the public beamtimes in the public subfolder.
Due to technical limitations of DOOR accounts, rsync is not available as a protocol. For an rsync-like experience, rclone might be a suitable alternative.
SSH Fingerprints of psftp.desy.de
If you connect for the first time to psftp.desy.de, the fingerprint of the server will be shown.
Please compare this fingerprint to the documented values shown below. If the fingerprints match, you can trust it and the decision is saved for future connections.
If the fingerprint changes afterwards, you'll get a warning. In this case, compare the displayed fingerprints with the documented fingerprints on this page again.
In case of doubt, do not enter your DOOR user password and contact it-asap3@desy.de
| Key Type / Hash | RSA | ED25519 |
|---|---|---|
| MD5 | MD5:98:0b:a6:80:c0:07:e1:ed:9f:6b:37:f5:7d:9b:4f:90 | MD5:53:a7:5d:52:b8:7c:64:65:87:54:6b:a0:c3:d0:bc:9b |
| SHA256 | SHA256:x9rZDr8w/f3jXAVCFUO3JAeVrSpdZnT6KigL+S6z0WE | SHA256:jgr7V+4/Uw7WTAeP2ifUbhd1xBM68KinAex0nbKfYK0 |
Configuration Examples for Tested SFTP Clients
We have tested the following SFTP clients, other clients will most likely work as well, but have not been explicitly tested.
The recommended SFTP client is FileZilla, due to it's cross-platform availability and ease of use.
| Client | FileZilla | rclone | Cyberduck | WinSCP |
|---|---|---|---|---|
| License | GPLv21 | MIT | GPLv22 | GPLv3 |
| GUI | + | - | + | + |
| Cross-Platform (Linux, macOS, Windows) | + | + | - | -- |
| Recursive & Parallel Downloads | + | + | + | + |
| rsync-like Experience | - | + | - | - |
1: Windows installer might contain advertisements/bundled offers, you can opt-out from it
2: On application exit, prompts for a donation, can be skipped.
FileZilla (Linux, macOS, Windows) [Recommended Client]
- Free and Open Source SFTP Client available for all major platforms: Linux, macOS & Windows
- Download: https://filezilla-project.org [external link]
- Official Documentation: https://wiki.filezilla-project.org/Documentation [external link]
- The Windows installer might try to install advertisements/bundled offers.
You can opt-out of this during installation or download an installer without bundled offers from the FileZilla project homepage:- Download -> Show additional download options -> Windows (64bit x86)
- For Linux: FileZilla is available in the standard repositories on various popular distributions, like Debian, Ubuntu, OpenSUSE Tumbleweed or Fedora.
Configuration & Usage Example
- Add a new Site by clicking on the Site Manager Icon in the upper left corner

- Select SFTP - SSH File Transfer Protocol and enter psftp.desy.de with port 22.
Enter your DOOR username in the User field, you can now connect to the SFTP server by clicking on Connect.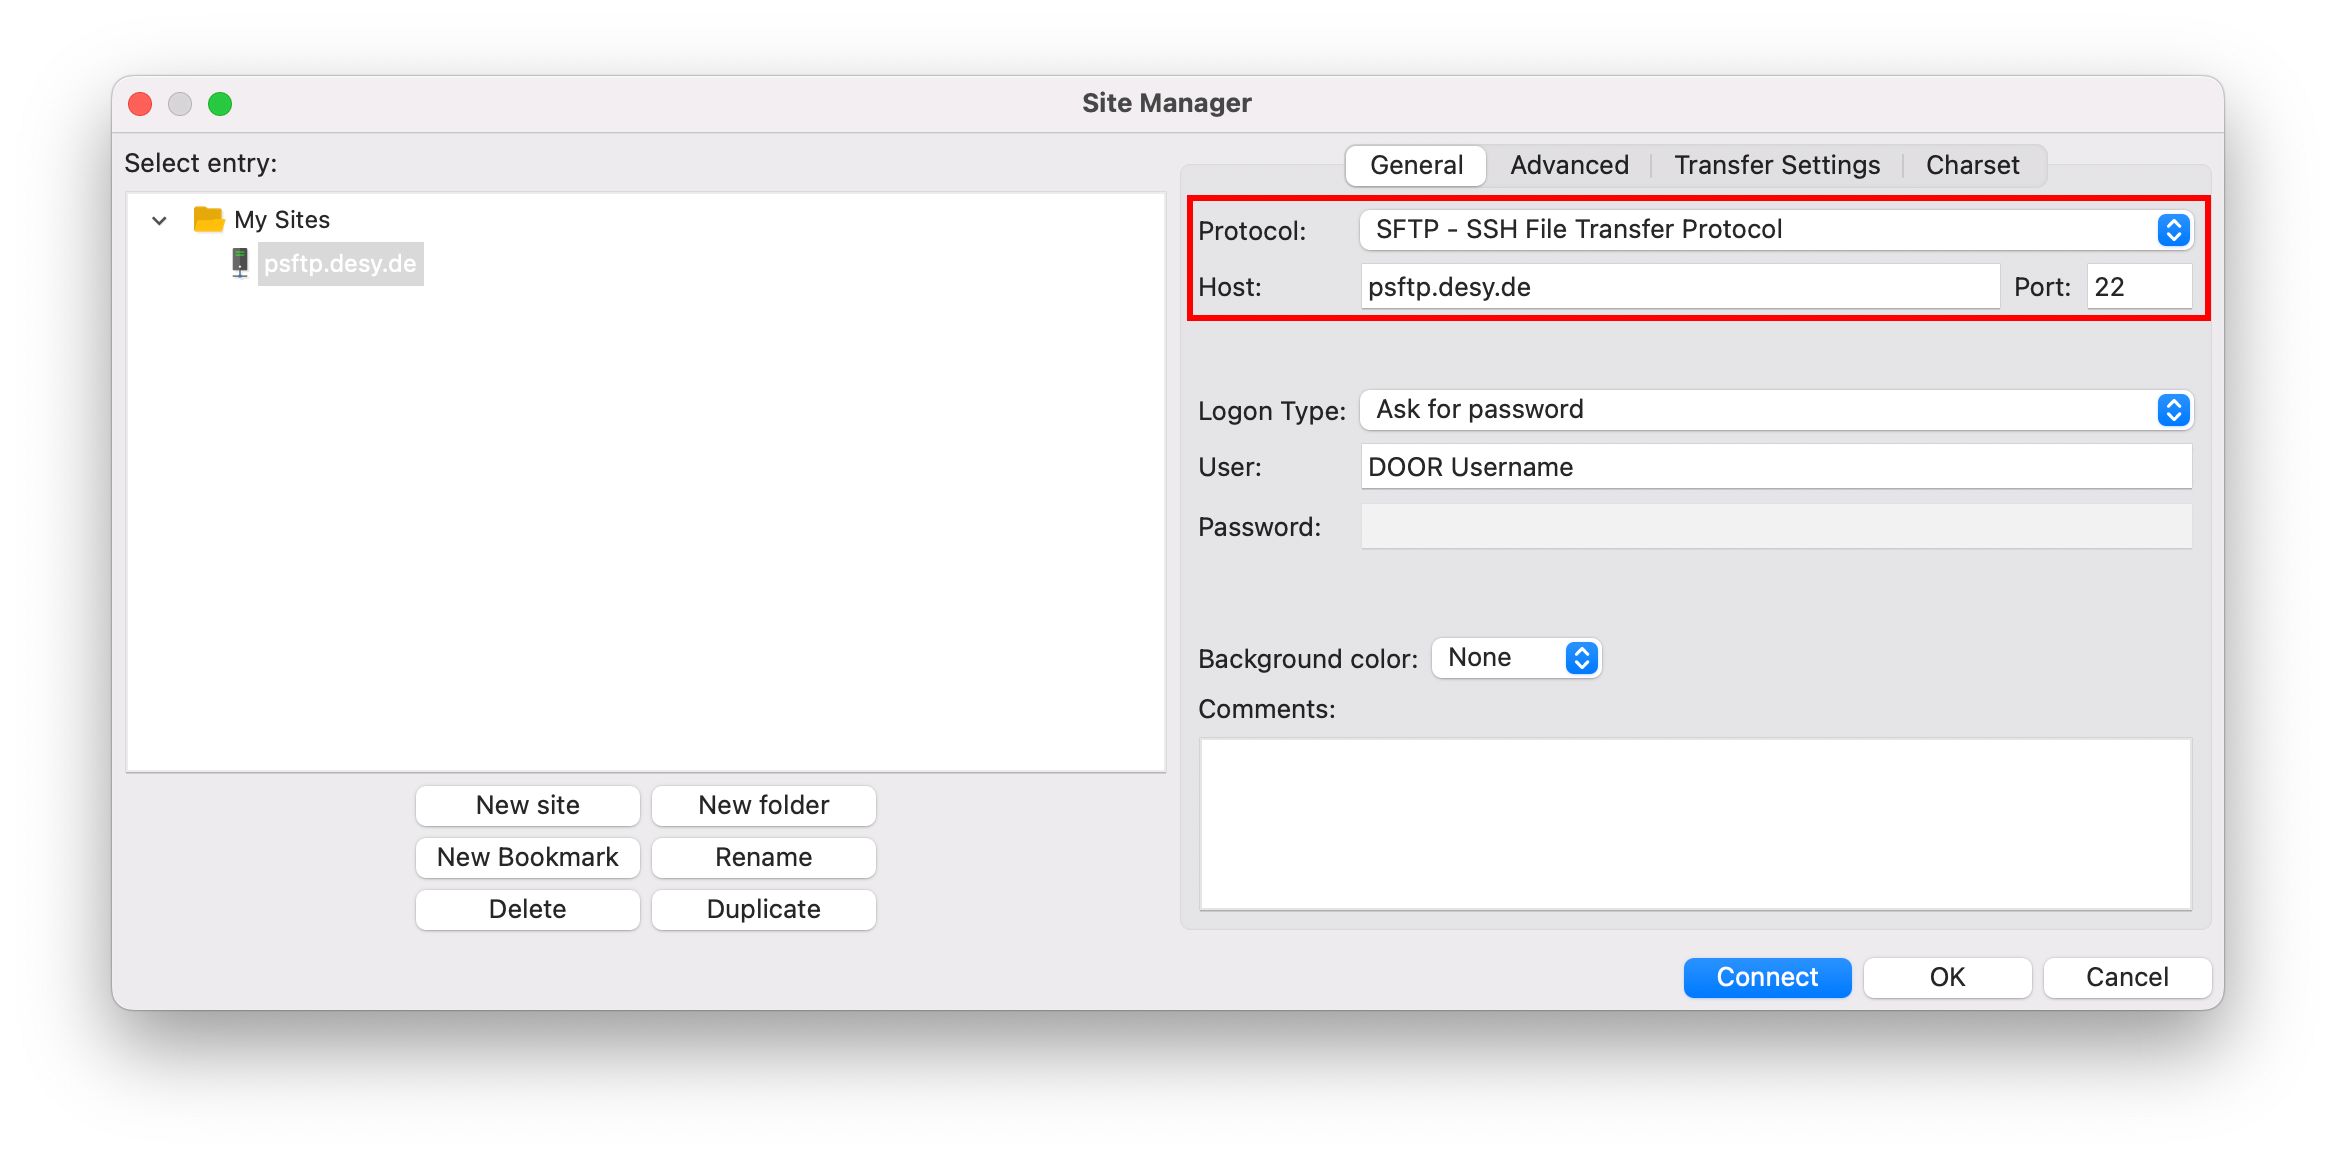
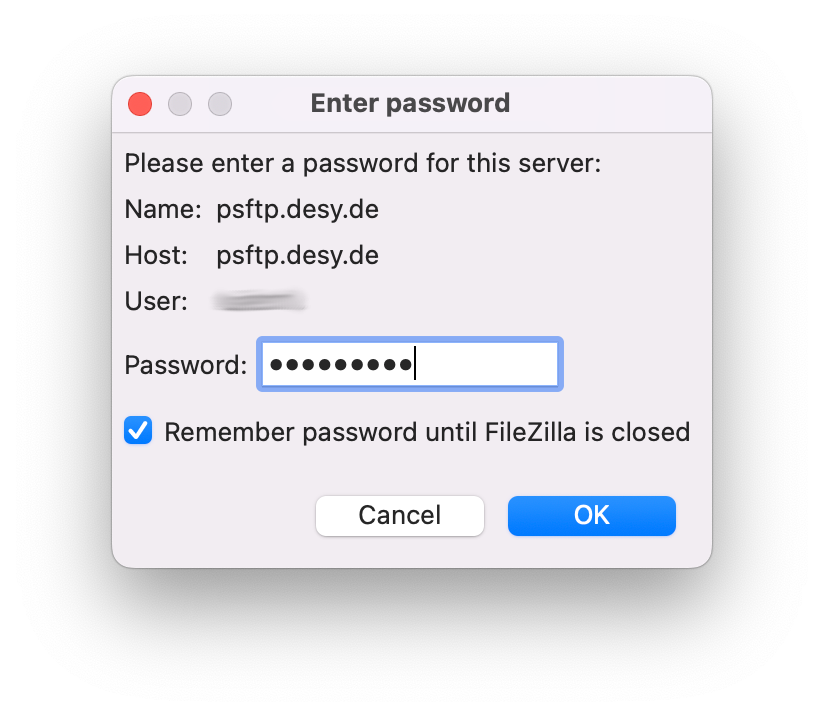
- In the new window, enter your DOOR password. It's recommended to select Remember password until FileZilla is closed.
- If this is your first time connecting to the SFTP server, you will receive a warning about an unknown host key.
Compare the Fingerprint with the documented fingerprints on this page. If the fingerprints match, click on OK.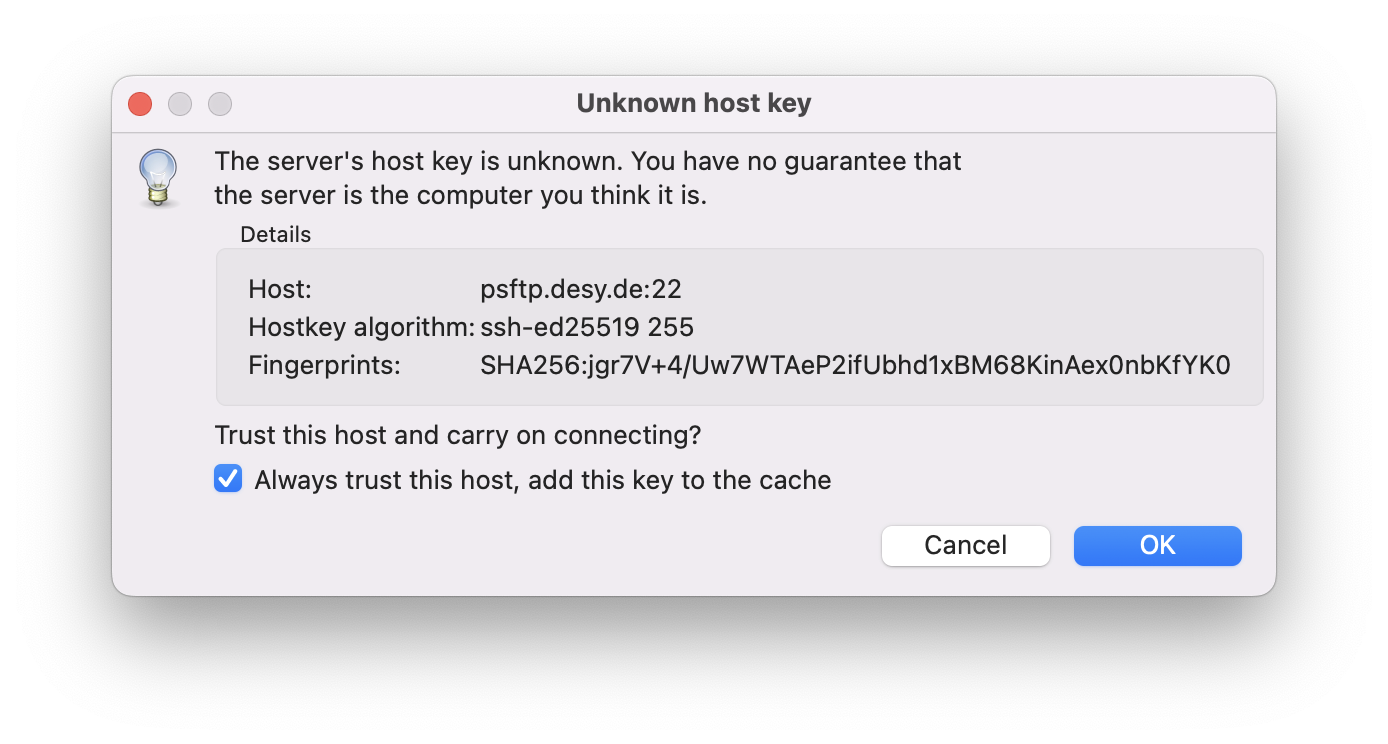
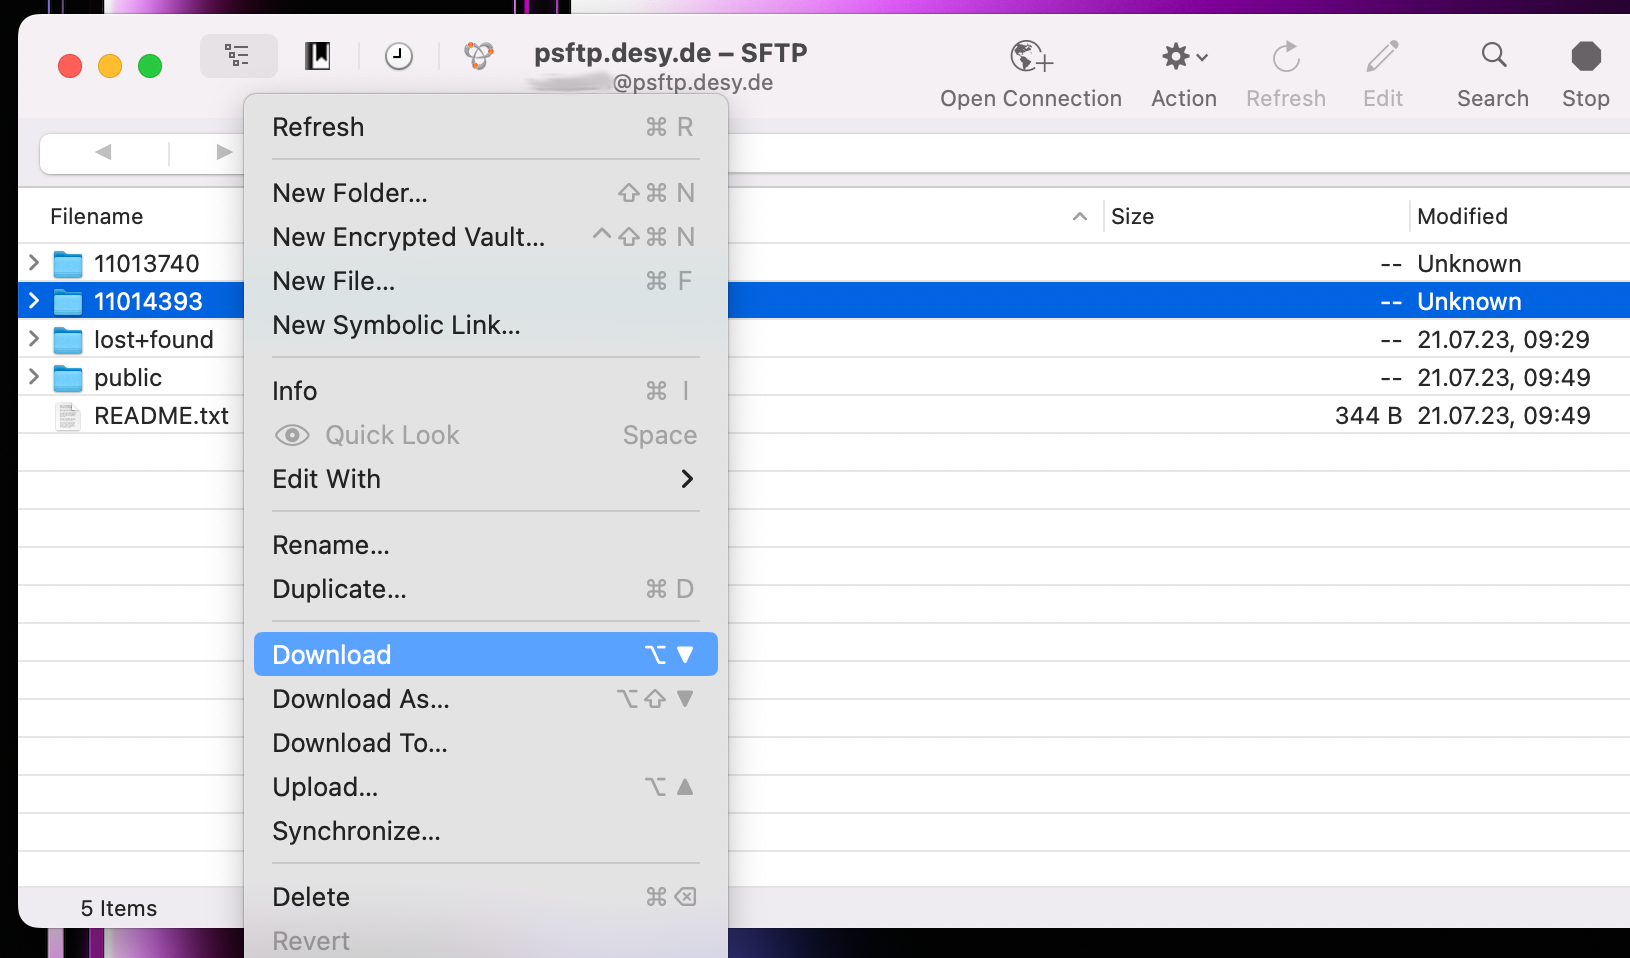
- You have now established the connection to the SFTP server. On the right hand, you can see all your accessible beamtimes for browsing and download.
If you do not have access to any beamtimes, only the README.txt and public folder will be visible.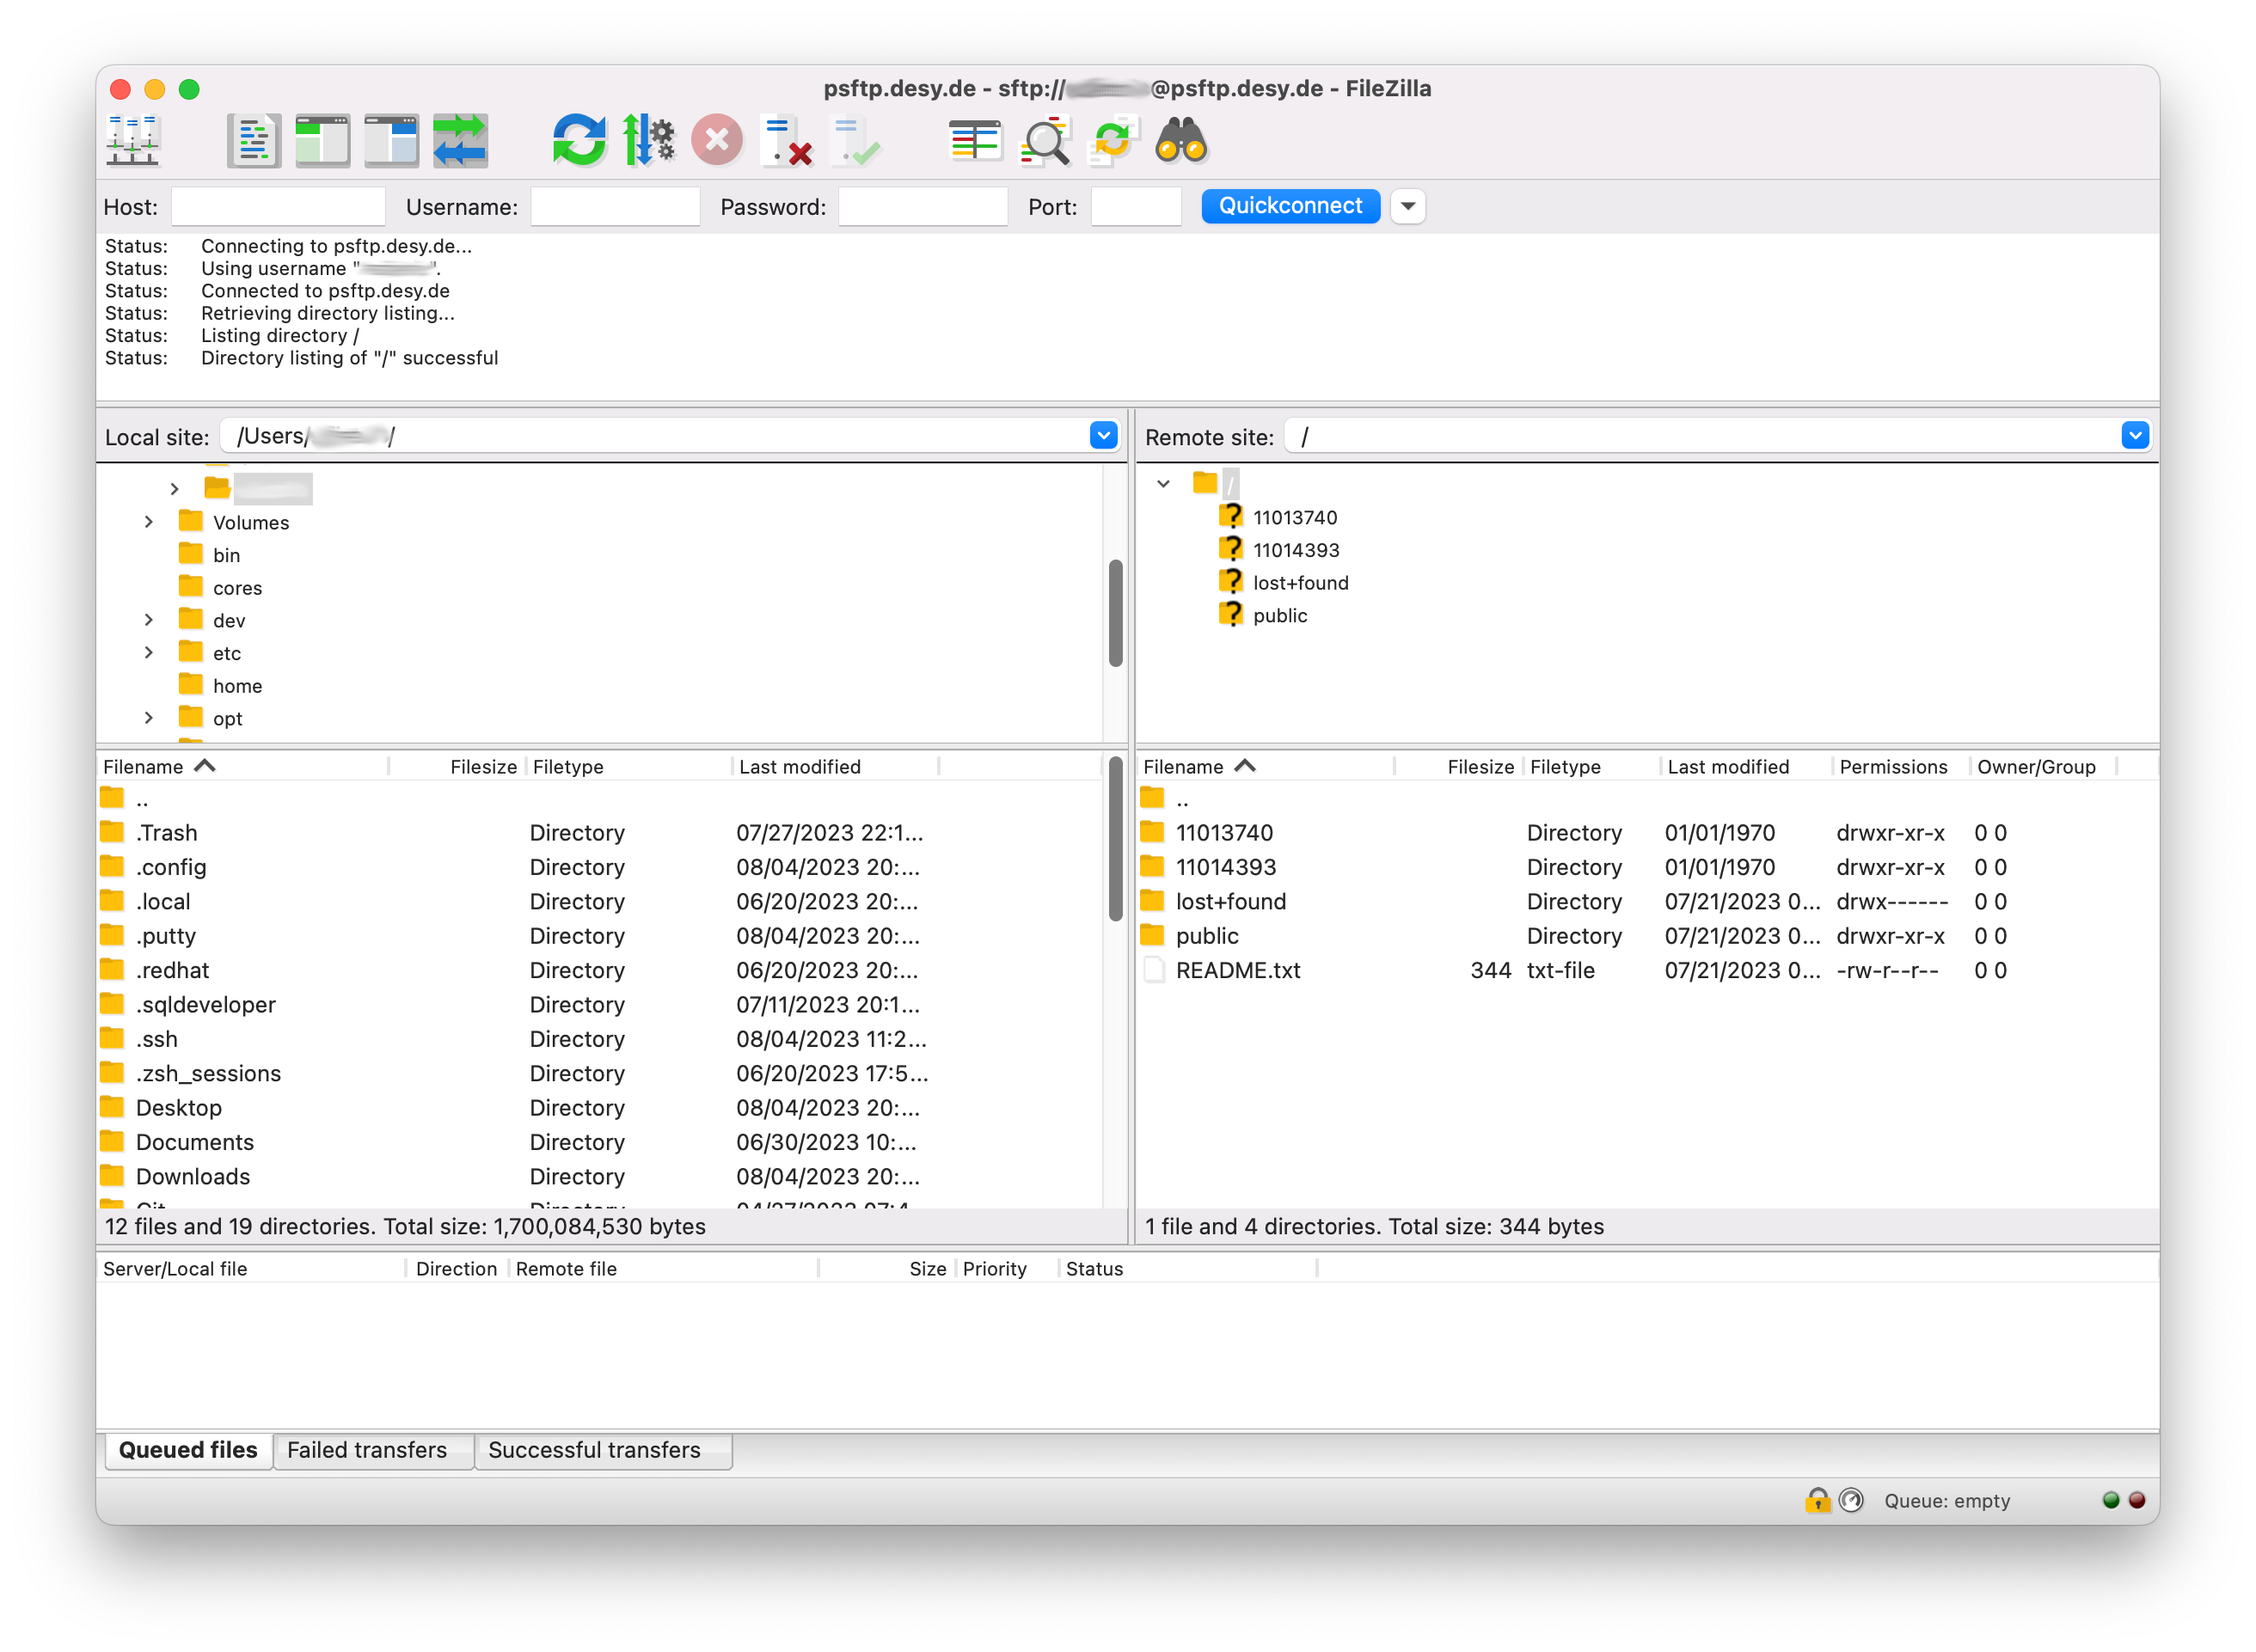
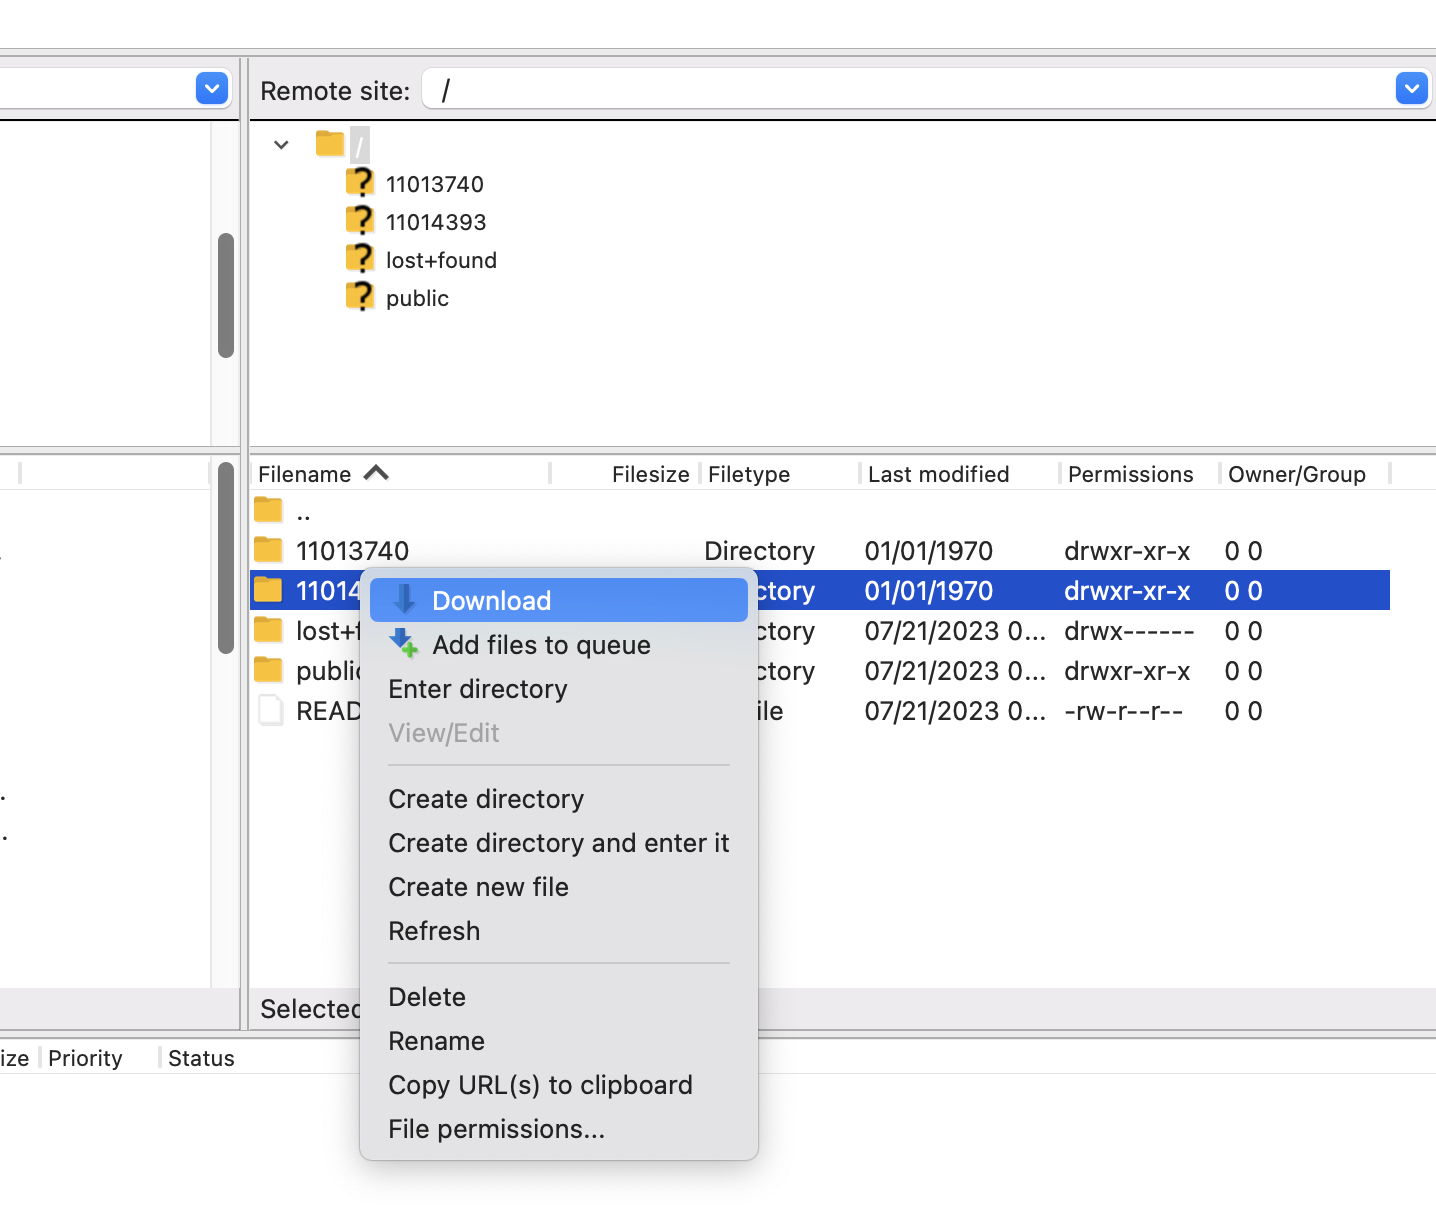
- To download a complete beamtime, perform a right click on the folder and select Download. FileZilla will start to download the data.
As an alternative to adding a connection profile, you can use the Quickconnect feature. You need to explicitly set Port 22:
rclone (Linux, macOS, Windows)
- Free and Open Source command-line program to manage files on cloud storage, including support for SFTP. Available for Linux, macOS & Windows.
- Download: https://rclone.org [external link]
- For Linux: rclone is available in the standard repositories on various popular distributions, like Debian, Ubuntu, OpenSUSE Tumbleweed or Fedora.
- You can sync directory trees with the command line, similar to rsync
Configuration & Usage Example
This example has been tested and verified with rclone 1.60 (released on 2022-10-22) on a Fedora 38 installation.
Run rclone config to setup a new remote for psftp.desy.de
Note: Except for remotes, server, user and password, you can use the default configuration by just pressing enter.~ % rclone config 2023/08/07 08:09:46 NOTICE: Config file "/home/ACCOUNT/.config/rclone/rclone.conf" not found - using defaults No remotes found, make a new one? n) New remote s) Set configuration password q) Quit config n/s/q> n Enter name for new remote. name> psftp.desy.de Option Storage. Type of storage to configure. Choose a number from below, or type in your own value. <output reduced> 38 / SMB / CIFS \ (smb) 39 / SSH/SFTP \ (sftp) 40 / Sia Decentralized Cloud \ (sia) <output reduced> Storage> 39 Option host. SSH host to connect to. E.g. "example.com". Enter a value. host> psftp.desy.de Option user. SSH username. Enter a string value. Press Enter for the default (ACCOUNT). user> DOOR Username Option port. SSH port number. Enter a signed integer. Press Enter for the default (22). port> 22 Option pass. SSH password, leave blank to use ssh-agent. Choose an alternative below. Press Enter for the default (n). y) Yes, type in my own password g) Generate random password n) No, leave this optional password blank (default) y/g/n> y Enter the password: password: Confirm the password: password: Option key_pem. Raw PEM-encoded private key. If specified, will override key_file parameter. Enter a value. Press Enter to leave empty. key_pem> Option key_file. Path to PEM-encoded private key file. Leave blank or set key-use-agent to use ssh-agent. Leading `~` will be expanded in the file name as will environment variables such as `${RCLONE_CONFIG_DIR}`. Enter a value. Press Enter to leave empty. key_file> Option key_file_pass. The passphrase to decrypt the PEM-encoded private key file. Only PEM encrypted key files (old OpenSSH format) are supported. Encrypted keys in the new OpenSSH format can't be used. Choose an alternative below. Press Enter for the default (n). y) Yes, type in my own password g) Generate random password n) No, leave this optional password blank (default) y/g/n> Option pubkey_file. Optional path to public key file. Set this if you have a signed certificate you want to use for authentication. Leading `~` will be expanded in the file name as will environment variables such as `${RCLONE_CONFIG_DIR}`. Enter a value. Press Enter to leave empty. pubkey_file> Option key_use_agent. When set forces the usage of the ssh-agent. When key-file is also set, the ".pub" file of the specified key-file is read and only the associated key is requested from the ssh-agent. This allows to avoid `Too many authentication failures for *username*` errors when the ssh-agent contains many keys. Enter a boolean value (true or false). Press Enter for the default (false). key_use_agent> Option use_insecure_cipher. Enable the use of insecure ciphers and key exchange methods. This enables the use of the following insecure ciphers and key exchange methods: - aes128-cbc - aes192-cbc - aes256-cbc - 3des-cbc - diffie-hellman-group-exchange-sha256 - diffie-hellman-group-exchange-sha1 Those algorithms are insecure and may allow plaintext data to be recovered by an attacker. Choose a number from below, or type in your own boolean value (true or false). Press Enter for the default (false). 1 / Use default Cipher list. \ (false) 2 / Enables the use of the aes128-cbc cipher and diffie-hellman-group-exchange-sha256, diffie-hellman-group-exchange-sha1 key exchange. \ (true) use_insecure_cipher> Option disable_hashcheck. Disable the execution of SSH commands to determine if remote file hashing is available. Leave blank or set to false to enable hashing (recommended), set to true to disable hashing. Enter a boolean value (true or false). Press Enter for the default (false). disable_hashcheck> Edit advanced config? y) Yes n) No (default) y/n> n Configuration complete. Options: - type: sftp - host: psftp.desy.de - pass: *** ENCRYPTED *** Keep this "psftp.desy.de" remote? y) Yes this is OK (default) e) Edit this remote d) Delete this remote y/e/d> y Current remotes: Name Type ==== ==== psftp.desy.de sftp e) Edit existing remote n) New remote d) Delete remote r) Rename remote c) Copy remote s) Set configuration password q) Quit config e/n/d/r/c/s/q> qBy default, rclone does not verify the host keys of the remote target. You should create your own known_hosts file for rclone:
Scan the host keys of psftp.desy.de and create a known_hosts file for rclone:
% ssh-keyscan psftp.desy.de > ~/.config/rclone/known_hosts
# psftp.desy.de:22 SSH-2.0-SSH-2.0-OpenSSH_9.3
# psftp.desy.de:22 SSH-2.0-SSH-2.0-OpenSSH_9.3
# psftp.desy.de:22 SSH-2.0-SSH-2.0-OpenSSH_9.3
# psftp.desy.de:22 SSH-2.0-SSH-2.0-OpenSSH_9.3
# psftp.desy.de:22 SSH-2.0-SSH-2.0-OpenSSH_9.3
Display the fingerprints from the scan, compare the fingerprints with the documented fingerprints on this page
% ssh-keygen -l -f ~/.config/rclone/known_hosts
3072 SHA256:x9rZDr8w/f3jXAVCFUO3JAeVrSpdZnT6KigL+S6z0WE psftp.desy.de (RSA)
256 SHA256:jgr7V+4/Uw7WTAeP2ifUbhd1xBM68KinAex0nbKfYK0 psftp.desy.de (ED25519)
Update the rclone configuration in
~/.config/rclone/rclone.confwith an editor and addknown_hosts_file = ~/.config/rclone/known_hosts% cat ~/.config/rclone/rclone.conf [psftp.desy.de] type = sftp host = psftp.desy.de pass = <REMOVED> shell_type = unix md5sum_command = md5sum sha1sum_command = sha1sum known_hosts_file = ~/.config/rclone/known_hosts
You can now connect to psftp.desy.de via rclone:
~ % rclone lsd psftp.desy.de:/ --max-depth 1
          -1 1970-01-01 01:00:00        -1 11013740
          -1 1970-01-01 01:00:00        -1 11014393
          -1 2023-07-21 09:29:59        -1 lost+found
          -1 2023-07-21 09:49:57        -1 public
To synchronize a full beamtime, use
rclone sync -P psftp.desy.de:/BEAMTIME/ LOCAL_DIRECTORY/
Important: This might cause data loss on your local side, always use--dry-runto test first~ % rclone sync --dry-run -P psftp.desy.de:/11013740/ 11013740/ 2023-08-07 08:28:16 NOTICE: beamtime-metadata-11013740.json: Skipped copy as --dry-run is set (size 1.339Ki) Transferred: 243.798 MiB / 243.798 MiB, 100%, 24.403 MiB/s, ETA 0s Transferred: 121 / 121, 100% Elapsed time: 8.1s 2023/08/07 08:28:21 NOTICE: Transferred: 243.798 MiB / 243.798 MiB, 100%, 24.403 MiB/s, ETA 0s Transferred: 121 / 121, 100% Elapsed time: 8.1s ~ % rclone sync -P psftp.desy.de:/11013740/ 11013740/ Transferred: 243.798 MiB / 243.798 MiB, 100%, 20.515 MiB/s, ETA 0s Transferred: 121 / 121, 100% Elapsed time: 10.7s
For more details about the commands, check the official documentation:
- Command Overview: https://rclone.org/commands [external link]
- rclone sync: https://rclone.org/commands/rclone_sync [external link]
Cyberduck (macOS, Windows)
- Free and Open Source cloud storage provider with support for SFTP connections, available for macOS & Windows
- Download: https://cyberduck.io [external link]
- Official Documentation: https://docs.cyberduck.io/cyberduck/ [external link]
- On closing Cyberduck, it asks for a donation, this can be skipped
Configuration & Usage Example
- Add a new Connection by clicking on Open Connection +

- Select SFTP (SSH File Transfer Protocol) from the drop-down list. For the Server, enter psftp.desy.de with Port 22.
Enter your DOOR username in the Username field and click on Connect.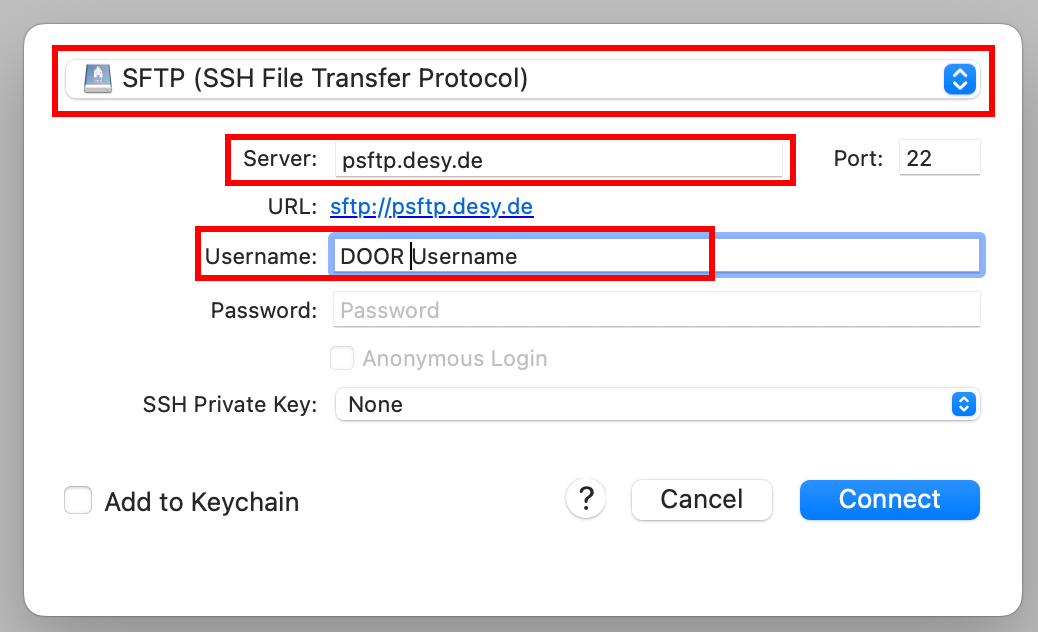
- If this is your first time connecting to the SFTP server, you will receive a warning about an unknown host key.
Compare the Fingerprint with the documented fingerprints on this page. If the fingerprints match, click on Allow.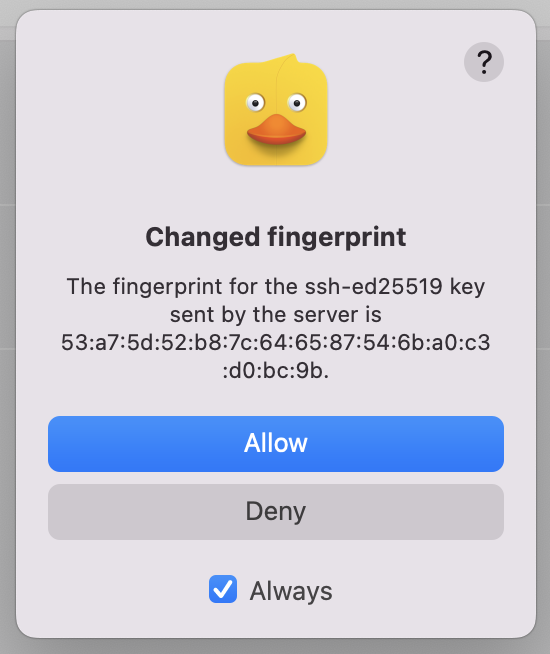
- You have now established the connection to the SFTP server. All of your accessible beamtimes are showed in the main window.
If you do not have access to any beamtimes, only the README.txt and public folder will be visible.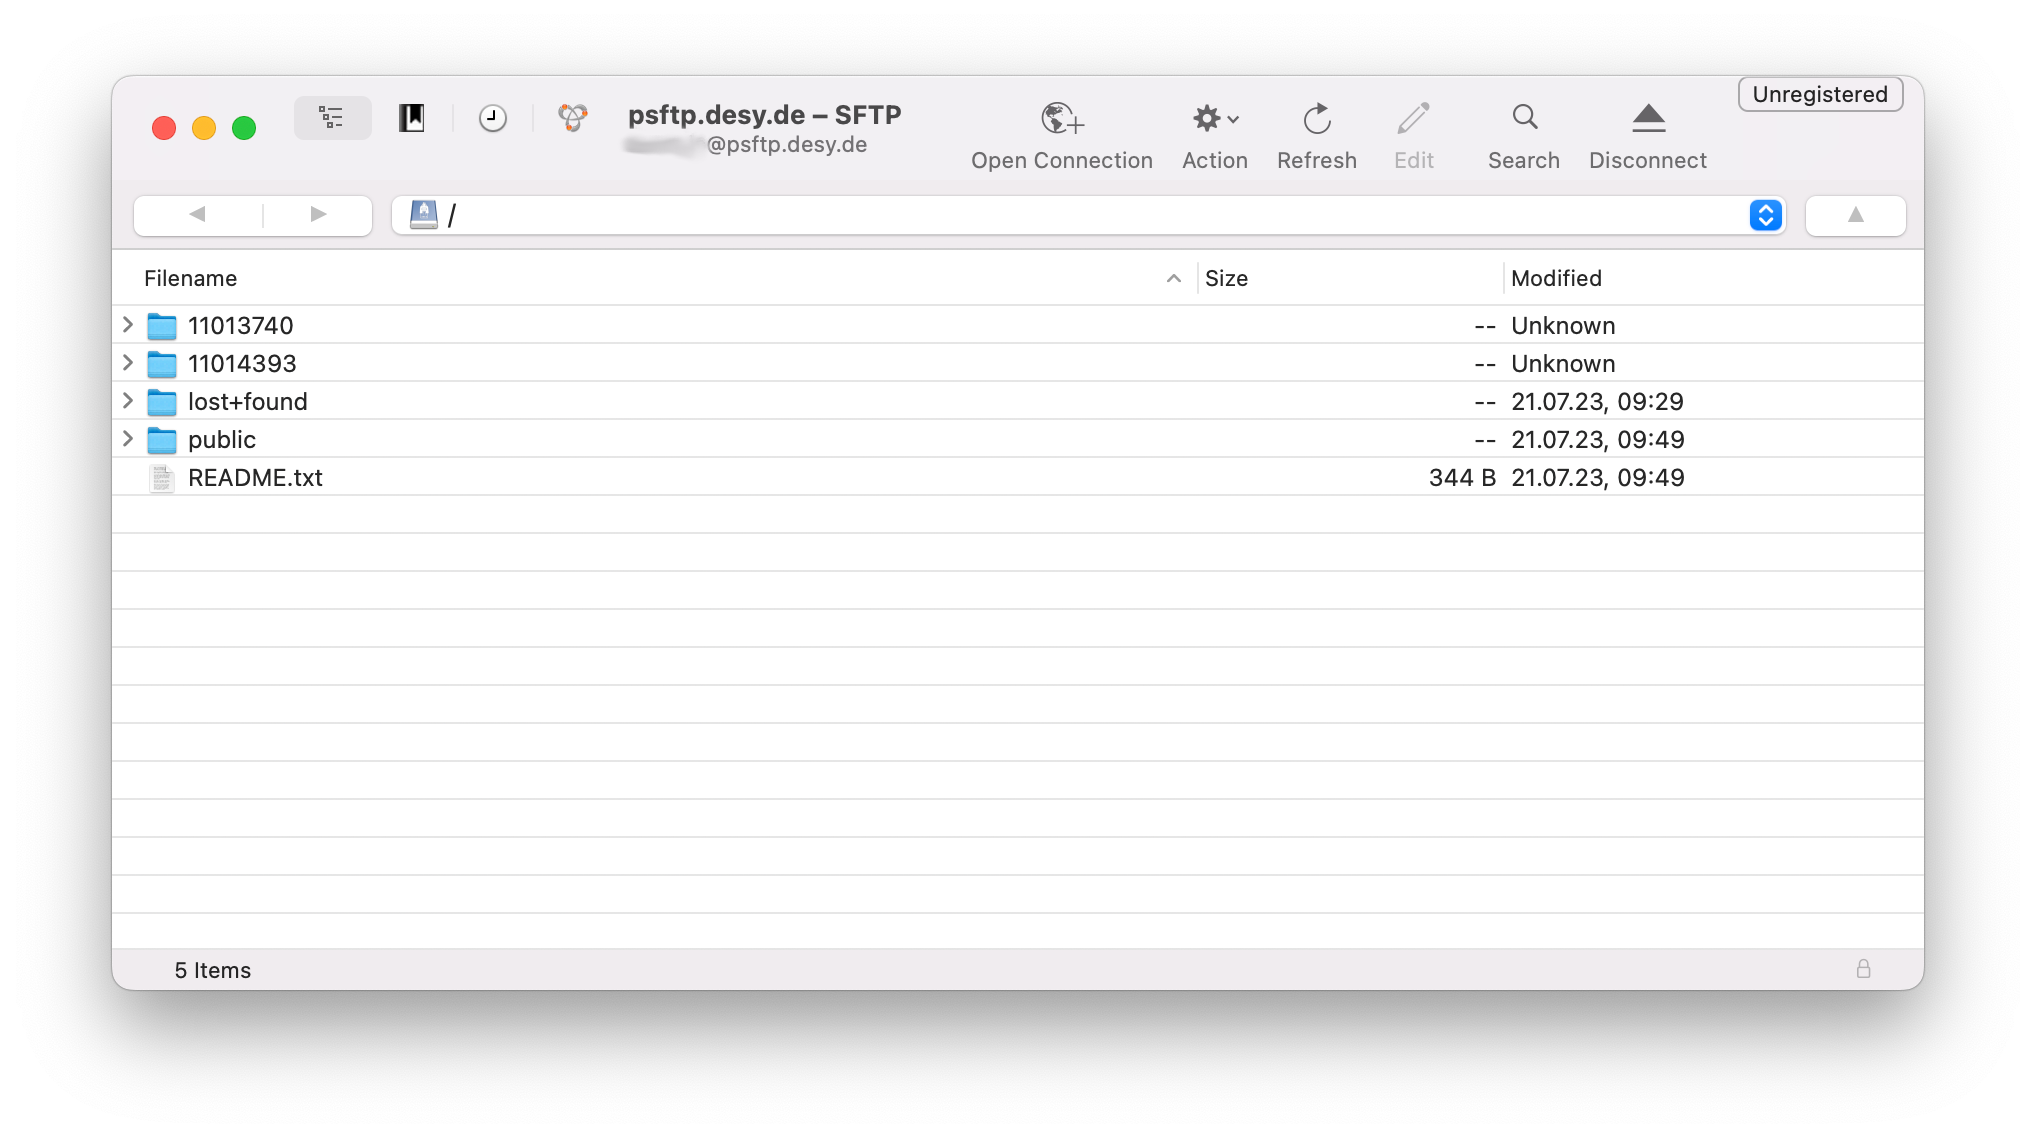
- To download a complete beamtime, perform a right click on the folder and select Download. Cyberduck will start to download the data.
WinSCP (Windows)
- Free and Open Source SFTP & FTP client for Windows with good integration
- Download: https://winscp.net [external link]
- Official Documentation: https://winscp.net/eng/docs/start [external link]
Configuration & Usage Example
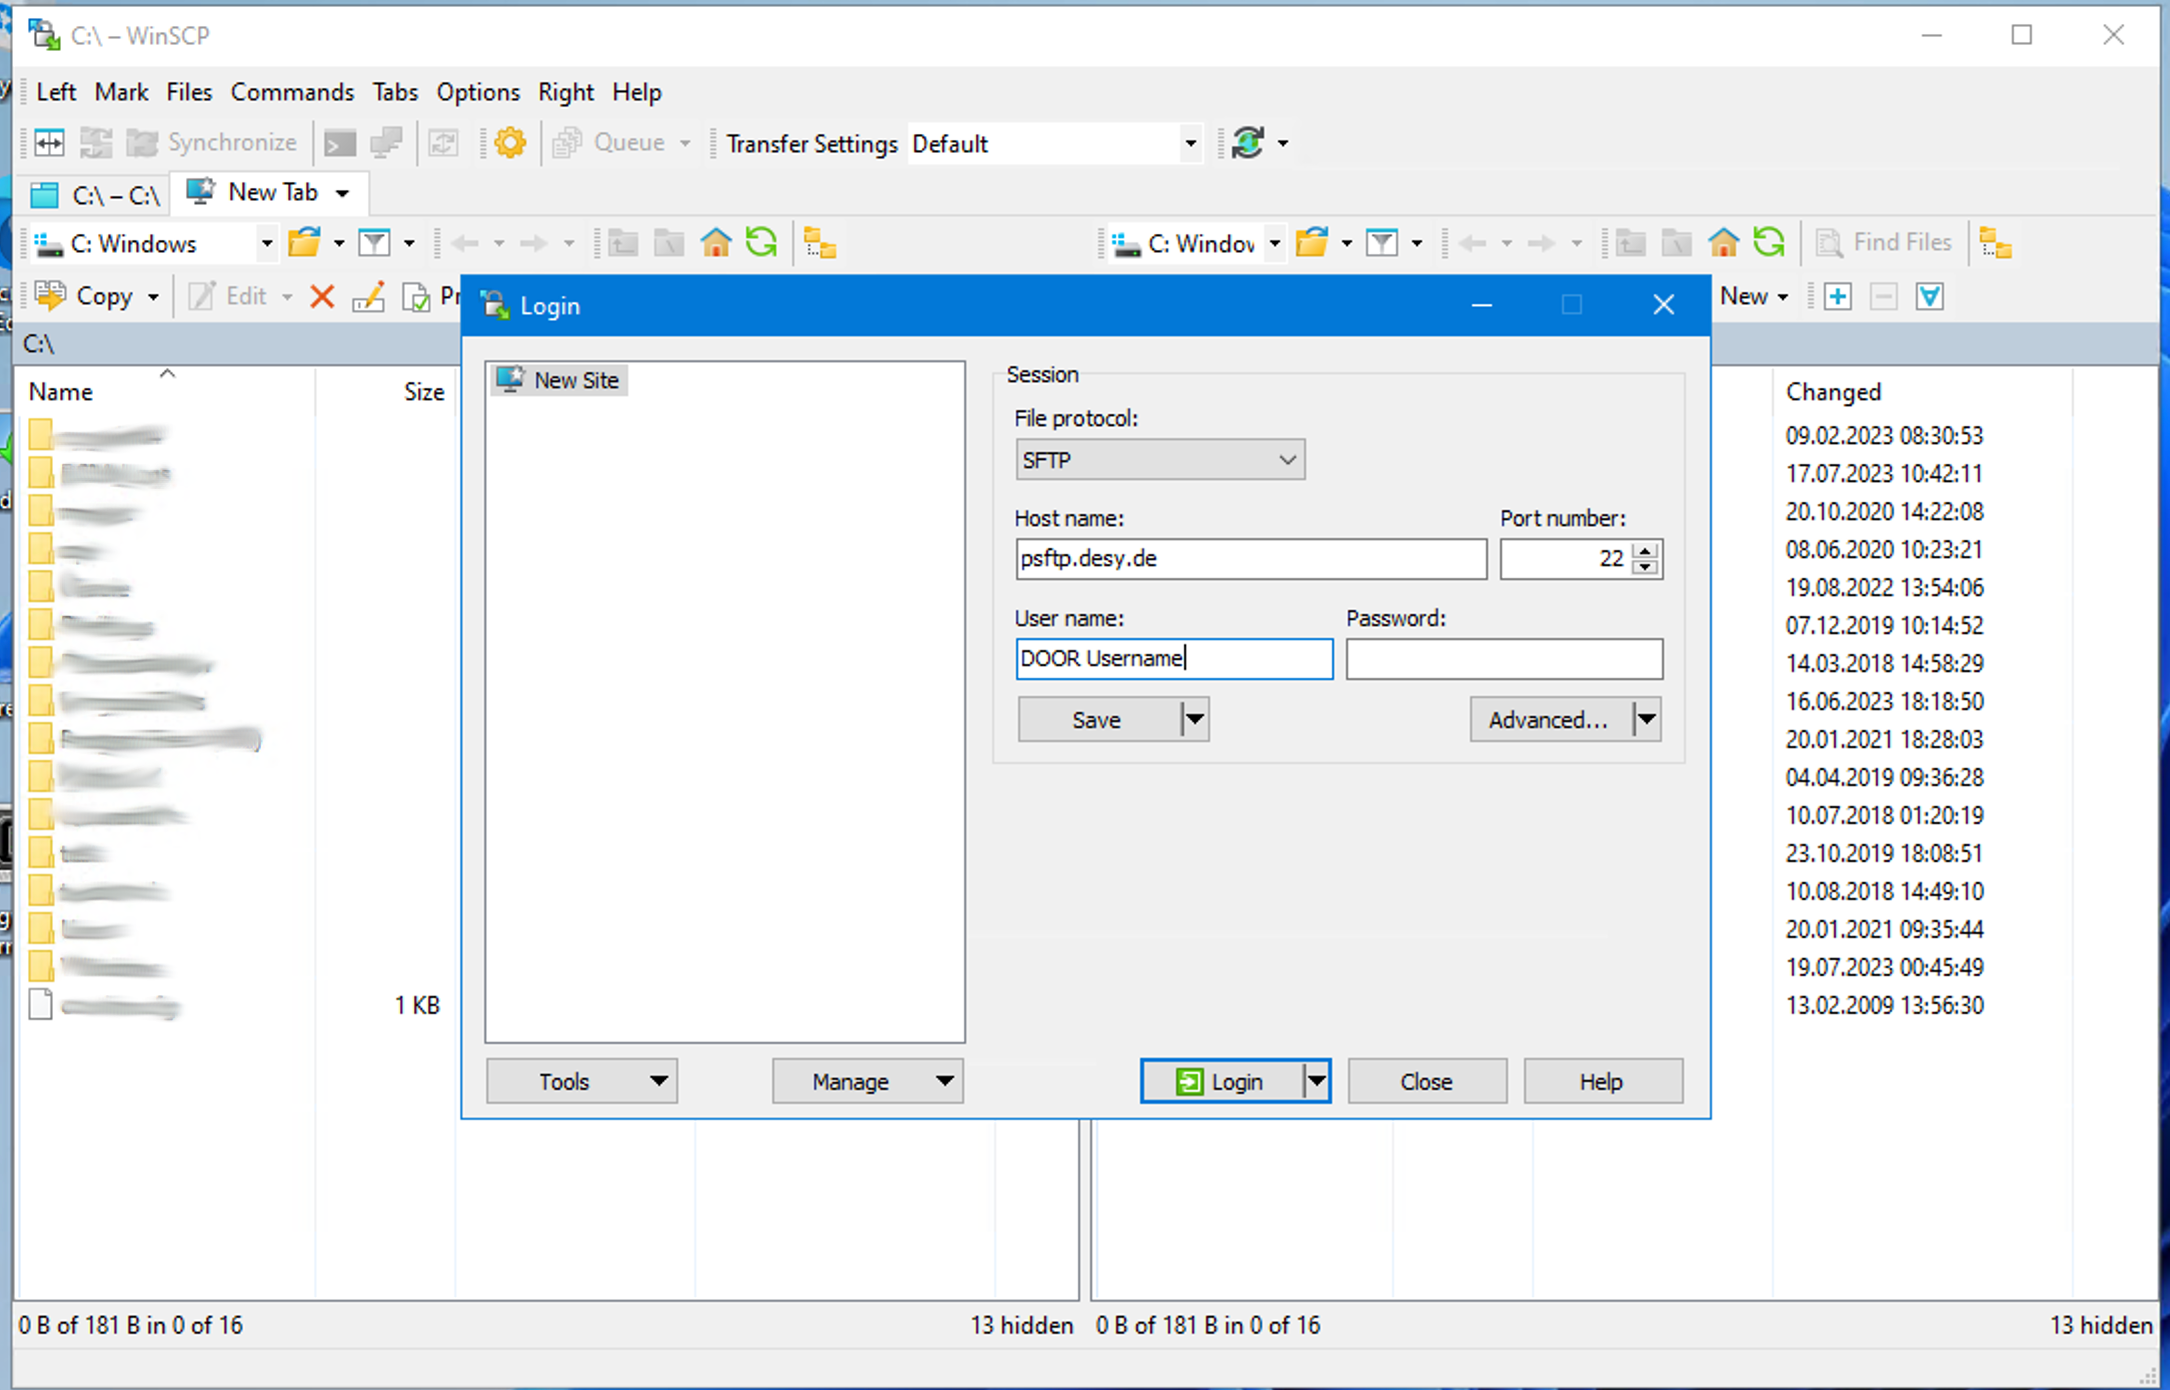
- After starting WinSCP, the connection editor should start. Add a new connection with psftp.desy.de as the server and port 22
- After clicking on Login, the connection will be established.
If you connect for the first time, compare the displayed SSH fingerprint with the documented fingerprints on this page.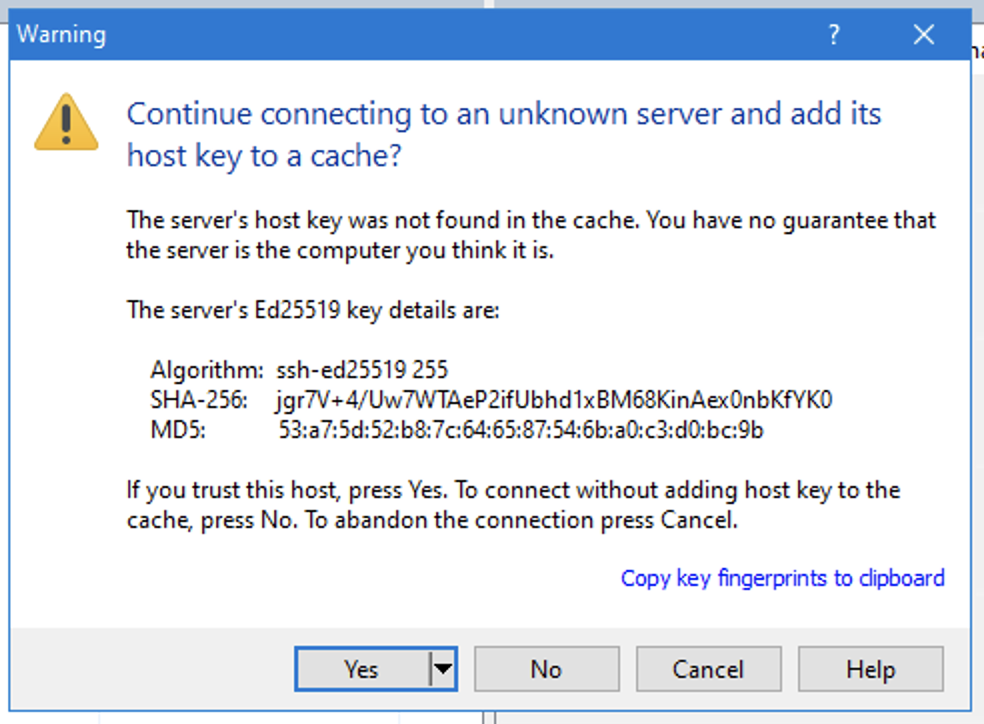
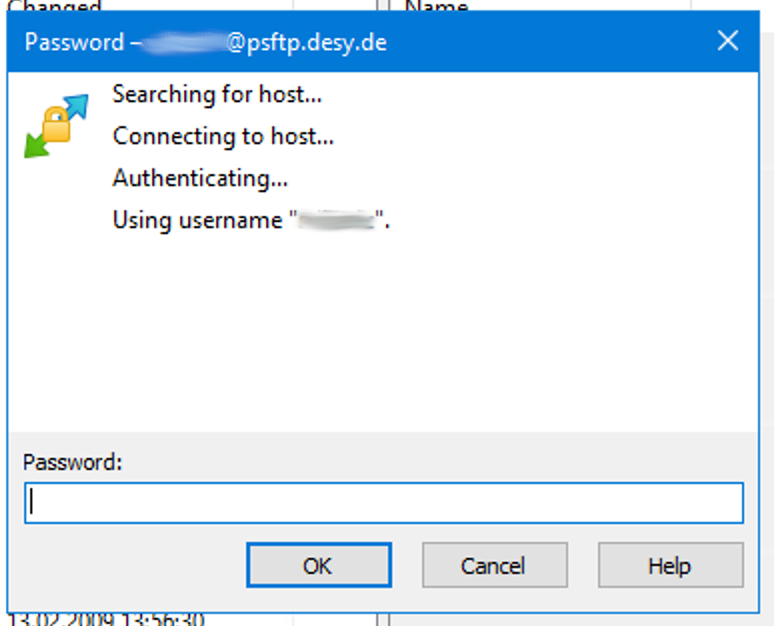
- You can now enter the password for your DOOR username
- You are now connected to psftp.desy.de. On the left, your local folder is displayed and on the right the accessible beamtimes on psftp.desy.de.
If you do not have any accessible beamtimes, only the README.txt and public folder will be displayed.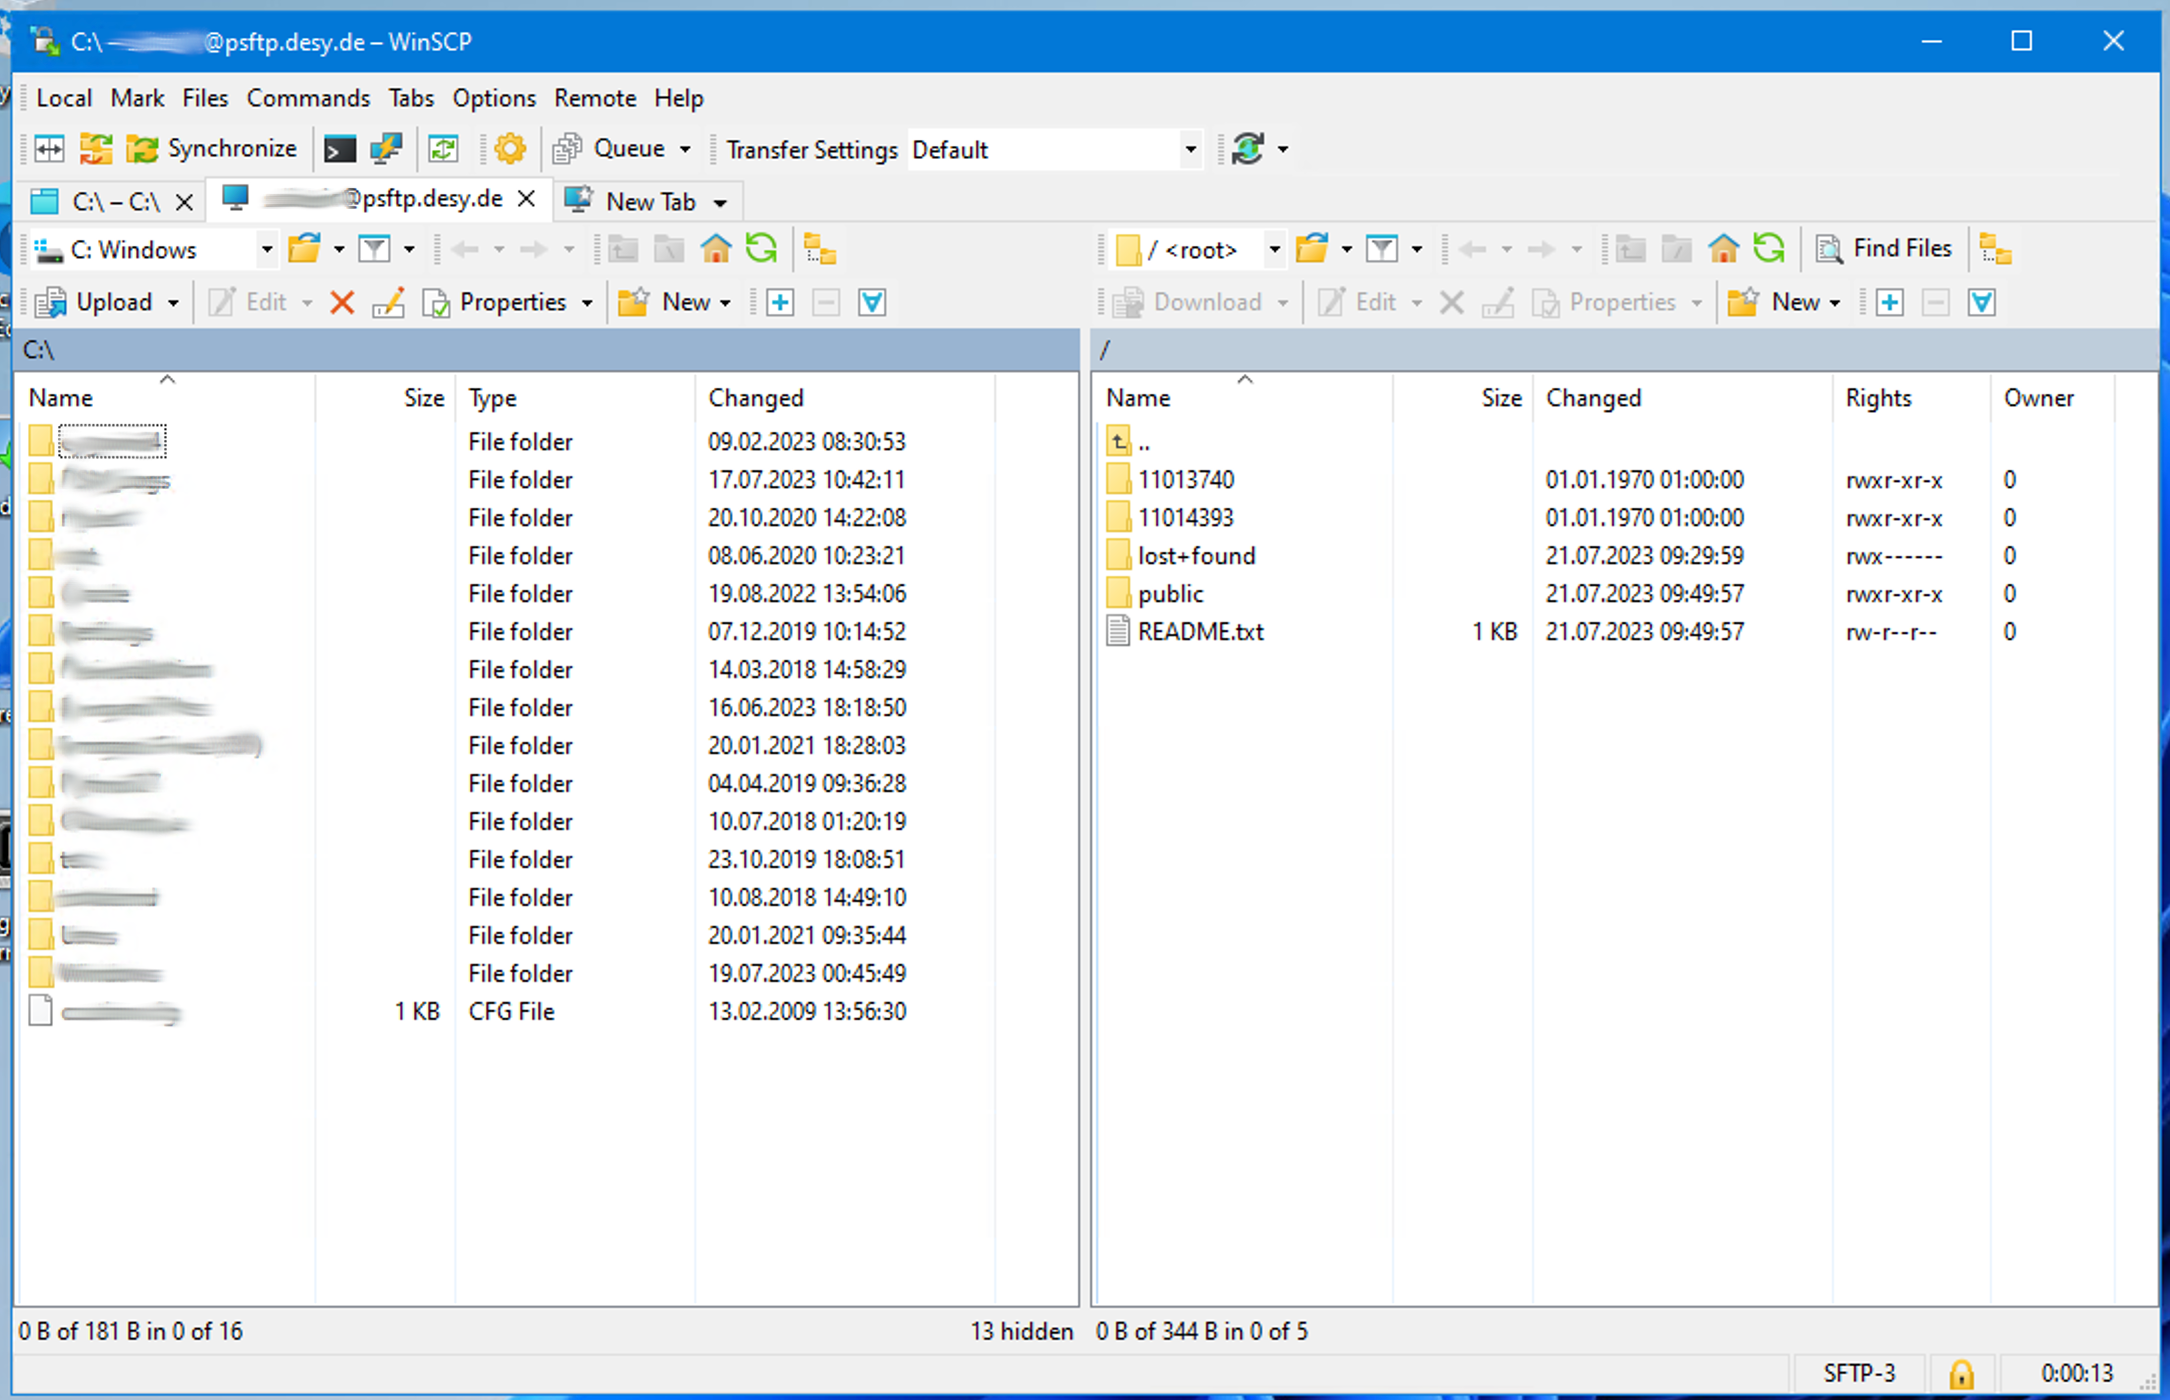
- To download a full beamtime, perform a right click on a beamtime and click on Download.
A new window will appear and ask for the download location.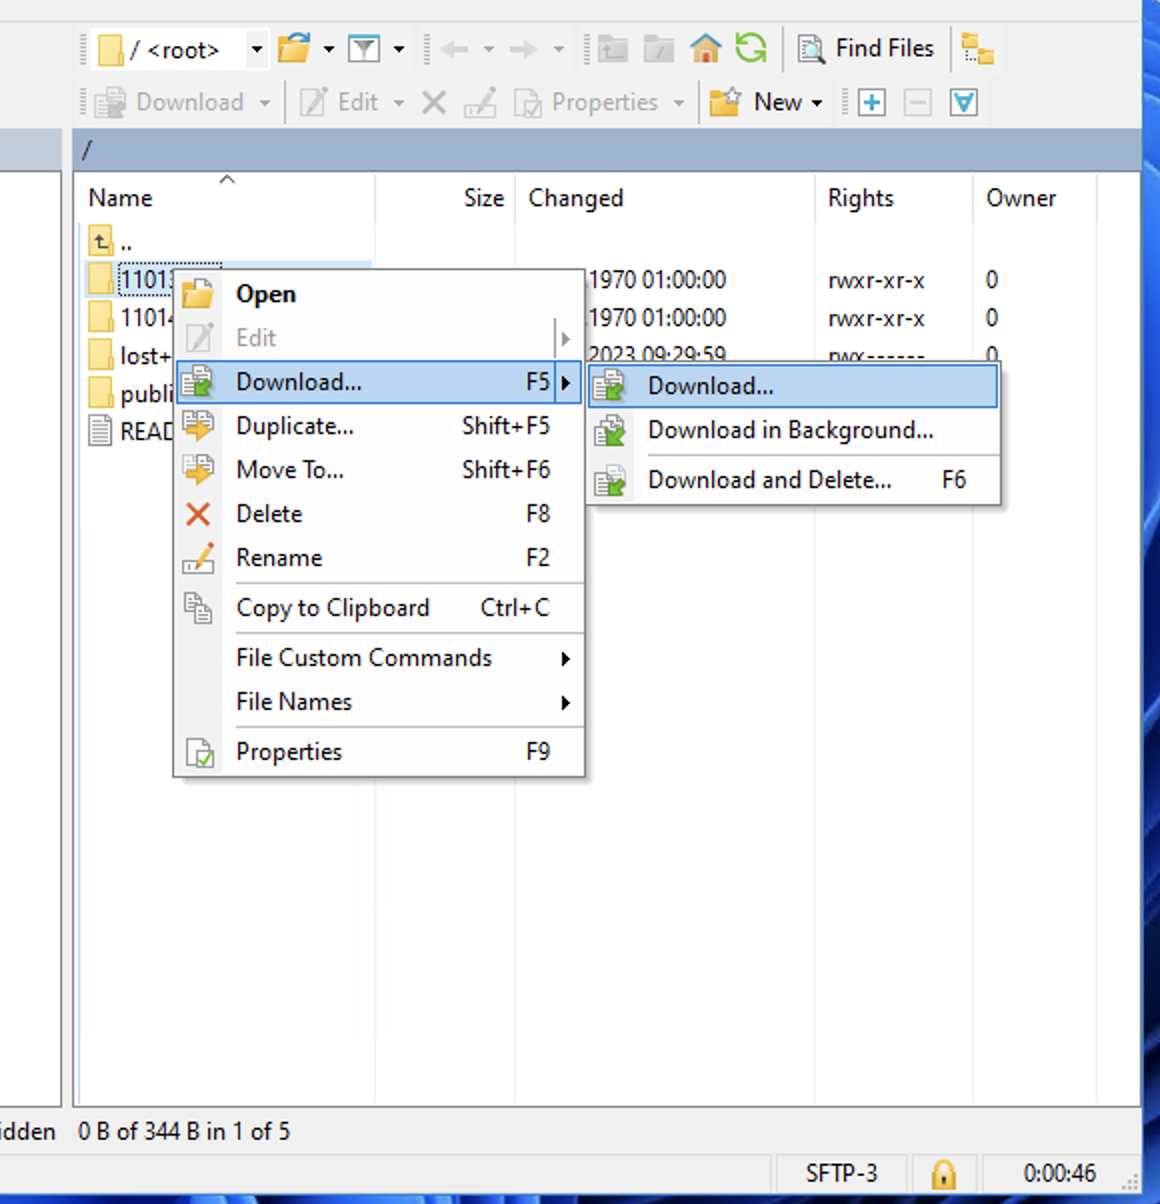